Thursday, September 24, 2015

Cracker Dip!

Hi All!  After a few month break I am back! 

I hope you have all had a great summer as I have.  We've had lots of things going on in this house.  We've played outside, we gone on lots of adventures, had family parties and best of all we just got back last week from Disneyland with my husband's family.  Right now, Mickey Mouse is my little boys favorite thing in the whole world.  This momma is just about Mickey Moused out!  But, it was so fun to see the look on his face when he saw Mickey.  My little guys melt my heart. 

 Don't mind me in the family picture, it was hot, sticky, and a get ready quick kind of morning!  The guys look pretty cute though!
This little one did not want to get out of Mickey's car.  Every time I turned around this is where he was or where he was heading.

Any how, enough of that. 

I have a delicious cracker dip recipe I want to share with you all.  This one is definitely a keeper.  It is great during all seasons which is the best kind of recipe I think!


This recipe is soo easy and takes five minutes to throw together.

Cracker Dip:

1 tub whipped cream cheese
1 packet clover club green onion dip mix
1/8 cup sour cream
A couple shakes salt

Mix altogether and chill.  Serve with all kinds of crackers. 

My favorite are the Triscuit thins with Parmesan and Garlic.  But, I serve with Wheat Thins, Club, Ritz, and Chicken 'N Biscuit also. 

Hope you enjoy!


Tuesday, June 23, 2015

Sweet Rolls

Hey Guys!  I'm finally back after a little while and I'm so excited. 

On every third Sunday, we go to my husband's parents for dinner and this week was my turn to bring the rolls/bread of some kind.  I asked my husband what kind he would like and he gave me the "I don't care, just whatever" answer that I totally hate.  So, I got thinking that I wanted something a little different and I wanted to try something new.

I'm so glad I did.  These turned out delicious!  If I do say so myself! The best part about it was they were so super easy and really don't take a whole of time.  The most time you wait is for the dough to rise.  While that was happening, I was able to get the boys ready to go see Grandma and Grandpa.

Don't these look divine?  (Don't mind my picture, I was trying to hurry and take it while trying to get the rest of the rolls on a plate and get out the door.) 


Sweet Roll Recipe:

Bread Dough

1 Tablespoon active dry yeast
1 1/2 cups warm water
1 1/2 Tablespoons sugar
1 teaspoon salt
3 Tablespoons vegetable oil
1 egg yolk
4-5 1/2 cups flour
2 tablespoons cold water

Combine the yeast, water and sugar in large mixing bowl and allow to stand a few minutes until it starts to foam.

Add salt, oil, and egg yolk and mix together. Add 3 cups flour and mix until it's combined.  Add enough more flour to make the dough barely stick to your finger.  Mix for another 2 to 3 minutes. 

Cover and let rise for an hour. 

While your dough is rising, mix together the ingredients for the filling.

Filling:

1-8 oz cream cheese at room temperature
1 Tablespoon powdered sugar
1 teaspoon vanilla
1/2 can pie filling (I used raspberry but blueberry or cherry would be great too!)


Mix the cream cheese, sugar, and vanilla until smooth.  Fold in pie filling.  (This does make kind of a funky texture but it still turns out great.)

After the dough has raised, roll out so it is between 1/4-1/2 thick depending on your preference.  (I like mine at about 1/2.)

Spread your mixture on the dough and roll the dough up like you would cinnamon rolls or jelly rolls.  Cut into about 12-15 equal pieces and put each one in a greased muffin tin.

Turn your oven onto 350 and let the rolls rise while the oven is heating. 

Bake for about 20-22 minutes.  You may want to keep an eye on them and check on them half way through or so to ensure the tops are browning to bad.  If this happens, just cover with aluminum foil and continuing baking.

After they are finished, let cool a little bit and take them out of the tins and glaze if desired. 

Glaze:

1/4 cup melted butter
4-5 heaping Tablespoons powdered sugar
Evaporated milk (Enough to make it the runny consistency.)
1/2 teaspoon vanilla

Mix together and pour over semi-cooled rolls.

Enjoy!

If you make these, come back and let me know what you think!

Wednesday, June 17, 2015

Elegant Chicken Salad


I love salads. Any kind of salad really.  Pasta, broccoli, vegetable, fruit salad.  You could almost call me a salad junkie. When I make salad I make sure and have enough for dinner that night and breakfast, lunch and dinner the next day!

My dad and I are a like in the salad loving goodness.  I remember growing up that on his birthday his request for dinner was always potato salad, vegetable salad, chicken salad and rolls.  It is the best dinner ever and now it gets made more than just one day a year.   

I also love love love having BBQ's in the summer.  In fact, there are very few times that my oven is on when it is hot outside.  I'd rather keep the heat outside and the cool in and in order to do this, the meat cooking is done outside on the grill.  I'm almost becoming a pro at grilling but often times it is taken over by the hubs. I'm not complaining.  If he wants to help, I say let him!

I say this because this is the perfect salad to go with a summer BBQ.  It's light, easy and absolutely delicious!  I usually end up eating way to much of it and feeling like a bloated balloon by the end of our BBQ dinners.  But, it is so super worth it.

You should definitely try it out.

Elegant Chicken Salad Recipe

2 cups uncooked shell macaroni (I like to use the small shells)

1 cup Kraft Coleslaw dressing (Must use Kraft, it tastes and works the best)
1 cup mayonnaise

4 cups cooked cubed chicken
2 cups chopped celery
1/2 Tablespoons chopped onion
2 large cans pineapple (drained)
2 cups green grapes
2 cups chopped apples

1 1/2 cups cashews

Cook the macaroni, rinse and let cool.  While waiting for it to cool, mix together the Coleslaw dressing and mayonnaise.  Then mix the macaroni with the dressing mixture.  Chill for an hour to overnight.

When the macaroni and dressing have chilled, mix in the chicken, celery, onion, pineapple, grapes, and apples.

Then, you can either mix in the cashews right before serving or you can just let people put the cashews on themselves.  I like doing the later as it allows them to control how many cashews they have on their salad.

Now for the best part,  ENJOY!!

Try it out and tell me what you think!


Friday, June 12, 2015

Easy Baby/Toddler Bib


Do any of you moms out there have the same problem I do when it comes to getting your child to keep a bib on?  For Pete's Sake!  I just don't think it should be that difficult.  I put one on my toddler and he instantly has it off and looks at me, with strawberries dripping down his once upon a time clean shirt like "What mom?  What's wrong with looking like you never bathe me or wash my clothes?" It drives me crazy!

Not to mention, that I have an 8 month old who still manages to get his food everywhere while I'm feeding him.  Seriously, how does that happen?  I swear I put the spoon in his mouth every time.  How does it get in his hair, eyebrows, down his shirt, and in his eye? I guess it could be when I am trying to get the older one to put the strawberry in his mouth instead of across the room.

So, I came up with a solution that works for all of us.  Well, for the most part.

This bib is super easy and super cheap.  That's the best part.  I do love the cute bibs that are out there but who wants to spend a billion dollars on bibs that don't cover enough of the kids' chest?  Not me!  I would rather spend that money on something else.

P.S. I wish my good camera was working because these pictures are driving me nuts!


I really didn't think anything about this bib was really great until I started packing them around with me everywhere for the boys to wear when we were out to dinner and I got lots of questions as to where people could find them.  A lot are surprised when I said I just make them.  They think there is much more to them than there really is.  That is the best part!


So, the supplies you will need are:

1 kitchen towel
1 package of Extra Wide Double Fold Bias Tape that coordinates with your towel
Thread
Sewing Machine
Pins
Scissors
Ruler

First, take the towel and fold it in half lengthwise.  Then measure 5 inches in from the outside corner and cut a half circle like shown below.


Stick a pin in the center of the towel. (pretend that I didn't mess up here and that the tape isn't on.  I forgot to take a picture of the pin in the center before putting the tape on.)


Then measure 36 inches of your bias tape, fold it in half and stick a pin in the middle.


Unfold the towel and insert it into the fold of the bias tape making sure to line up the centers.  Continue pinning the bias tape around the "neck" of the bib.


If you want, you can pin all the way down the bias tape or if you are lazy like me, just hold it together while you sew it.

Final step is to fold the ends of your bias tape inward like shown and then fold back in half and sew from one end of the bias tape to the other.


Hooray!  You are done!  Super easy huh?  The best part is my toddler keeps it on because he still can't reach around to untie it in the back and it covers him almost completely from head to toe.

For my 8 month old, I follow all the same steps except for the first step would be to cut the towel in half like this first:


  Then, there are a couple ways to go.  I use my serger to serge across the cut edge of the towels but you could also fold it down 1/4" and then 1/4" again and sew across.

Then continue with the steps above.

Super simple!


Wednesday, June 10, 2015

July 4th Door Hanging

Yes, yes I know that my last post was a tutorial for the 4th of July, but like I said, I don't have anything for this holiday.  I'm feeling the need this year to spice up my house and my collection.  (I assure you, the hubs is not liking the feeling I'm having.)

I had so much fun with this project. (Mostly)  You know those days where you just can't get the itch in your pants to get anything done, then all the sudden, after the kids are in bed and the clock hits 10:30 pm you finally get some kind of energy from somewhere and you stay up way to long? Yeah, that is exactly what happened to me with this project just last night.

So, I got out all my stuff and my husband asked "What the heck are you doing?  You are usually getting ready for bed or are in bed sawing logs by this time."  All I could say is "I'm not really sure.  I just got some kind of energy and I need to feel like I have done something productive today."  So, the project began and then I had to finish it because I wanted to see the finished project right then.

It actually wasn't so bad and I liked how it turned out for the most part.

I actually wanted to put "God Bless America" or "Land of the Free" or "America the Beautiful" on it but I just couldn't get it to fit.  Oh well, this works for just wanting to get it done!


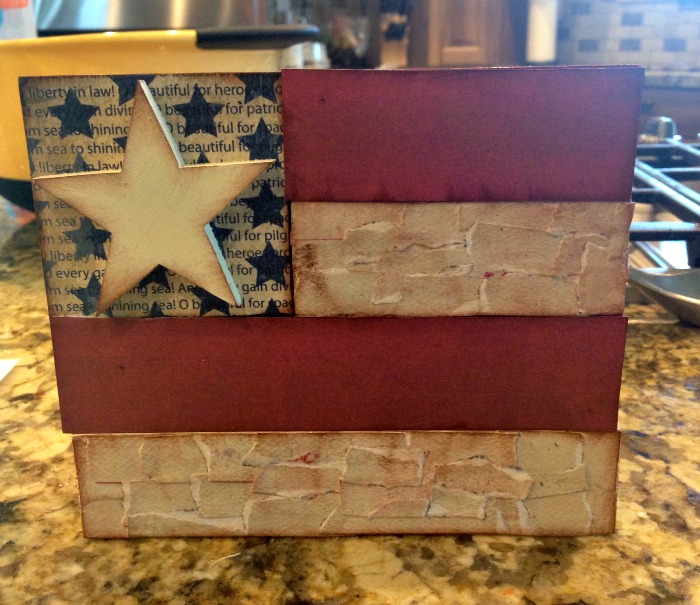
I just grabbed a pack of these babies from Hobby Lobby, they come in a pack of 4 for $2.99.  ( I then used a 40% of coupon which took them down to $1.80.  (I think I can handle that!)


I sanded them down a bit to make the paint stick a little better.  Then I painted two blue, one red, and one cream. The cream one I turned over and used the back side to paste the paper for the flag on.  It was a flat surface and easier to make the flag.  But, I wanted the grooves to show on the red and blue ones.

I painted the cream on first so that paint could dry as I was painting the others.  While I was waiting for the red and blue ones to dry, I took some paper I grabbed from The Wood Connection traced the block, cut the paper out and Modge Podged it on.  I then found some paper that would work for the star part, cut a square and Modge Podged that paper on top of the red and white stripe.  I had a little wood star and painted that cream as well and just plopped it down with some Modge Podge onto the star paper.  After everything was glued together, I Modge Podged over the top of everything again to make sure it all stuck.


After I got the flag part done, I grabbed my Cricut and cut out the letters using a 1" setting and the paper I used for the flag. (You could also paint them on or use stencils, but no where in my body do I have a steady hand to be able to do that.)

I Modge Podged all the letters on where I wanted them, once again making sure to Modge Podge over the top to ensure it is glued down.  Then when everything was dry I took my trusty ink chalk and went around the flag, star, and all the letters to add just a little more to it. (I tell you I love this thing.)


To assemble it, I just hot glued some heavy duty wire on the back of each piece and tied a loop on the top.  You will have to use quite a bit of hot glue and make sure you hold it down while it dries or it will just keep popping up.  After it was all put together, I didn't like the space of just wire between the loop and the flag so I decided to add some ribbon.  (However, the ribbon only came about after what felt like ten hours of trying to get the perfect ribbon bow. That failed.  Then tried to get the perfect burlap bow.  That failed.  So, then I decided to try this with different ribbons.)  I just tied the ribbon in knots around the wire, alternating colors, then fixing them at the end to how I wanted.  (Make sure you melt the ends with a lighter so they don't fray.)


So, other than a few things that I wanted different, I at least felt a little productive yesterday.

Let me know what you think!


Tuesday, June 9, 2015

4th of July Flag Tutorial


Are you like me and have zero decorations for the 4th of July? I decided it was time to change that this year because I finally have a few places I can put them up.  Hooray!  I also needed one more thing in my house to dust every week.

I began looking for something fun to create or do and I stumbled upon this already cut out wood flag from the local Wood Connection store.  Have you ever been?  It's far to much fun in there and you need about a million dollars every time you walk in.  So, because our family is trying to save some money, I had to limit myself to just one thing.  I settled for this!

After a little less than an hour, this is what I came up with and I am a little proud if I do say so myself!


Friends, this is seriously the easiest thing ever!  Nap time works great for this craft especially since all you need to do it cover it in paper because it is already cut out.

Supplies Needed:

1 flag from Wood Connection (or cut out yourself if you are amazing like that)
1 sheet red scrapbook paper
1 sheet white scrapbook paper
1 sheet of paper for stars
Red Paint
White Paint
Blue Paint
Brown Chalk Pad
Modge Podge
Paint Brushes

I grabbed my paper from The Wood Connection also because I loved what they had and it made it easier to make just one stop instead of what feels like 15.

 I did sand my down a little at first to make the paint stick better.  That is totally up to you.


Then I painted every other strip red and white and the square blue.  I painted all sides but the side I knew my paper would be covering.


After the paint dried, i took my white sheet of paper and tore it up and just started using the Modge Podge and a paint brush to glue it onto the white stripes.  I love this tearing method because it gives it some texture and you can't mess it up.  It always ends up looking super fun!  After the stripes were covered, make sure to Modge Podge over all the paper again to ensure it will stay glued down.


After I was done with the white stripes, I just traced the red stripes and the blue square on the coordinating papers, cut them out and Modge Podged them on.

I painted the star white and when the blue star paper was dry, I just used the Modge Podge to glue the star on to finish the flag.

 I liked it at that point but decide I wanted a little more so, I took my chalk pad  (Which I LOVE, if you haven't every used one you should because they are awesome)


and just brushed the edges of the stripes and brushed some in the middle of all pieces to add the little bit more that I wanted.  Then, I loved it!

I did also end up hot gluing the pieces together so I didn't have to keep reassembling it every time it gets knocked over.


So fun, so easy, and super cute!

Sunday, June 7, 2015

Best Banana Bread

I'm finally up and running again and I couldn't be more excited.   There are lots of things on the list to share with you and today it's Banana Bread.

Friends, this is the best banana bread I have ever had.  I say that because I hate banana bread.  Really, I hate anything banana.  But this recipe is fabulous!  It tastes more like a cake instead of a bread which makes it that much better.  It also doesn't have the super overwhelming banana flavor that I hate.

It's super moist and the best way to eat it is straight out of the oven.  I can't keep this bread around our house between my two year old and the hubs.  I have to take a slice or two when I can for me to even get any. 

You should definitely give it a whirl!  I promise you won't be disappointed.


Doesn't this look like it will hit the spot?

Banana Bread Recipe:

1 1/2 cups sugar
1/2 cup softened butter
1 cup buttermilk
2 eggs
2 1/2 cups flour
1 teaspoon baking powder
3/4 teaspoon baking soda
1/2 teaspoon salt
3 smashed bananas (sometimes I only use 2)

Cream sugar and butter together.  Add buttermilk and eggs mix again.  Add flour, baking powder, baking soda, and salt.  Mix together and add the smashed bananas. 

Grease and flour two loaf pans and bake at 350 for about 40 minutes.  I check mine after about 35.  Insert a toothpick to make sure it's done all the way through. 

Enjoy the banana goodness. 

Thursday, May 28, 2015

Toddler Memory Game


So, I've decided that I absolutely LOVE LOVE LOVE the foam shapes and foam sheets that they have for kids.  You know the ones I'm talking about right?  They are down the craft isle at Wal-Mart and they keep the kids busy for sometimes hours on end.  Yeah, I knew you did.  They are great right?

Anyway, for 8 years I was a teacher for 3 year old's in my church and that is when I found out about the awesomeness of this foam.  I would take the foam shapes often to let the kids put stick them on plain paper or we would make picture frames or even just another sheet of foam.  It was awesome it took up a bunch of time.  It was also a plus in letter them work on their motor skills in trying to figure out how to take the paper off of the back of the sticker and then trying to stick it on the piece of paper.

So,  I almost have a two year old and right now we are working on recognizing animals and their sounds.  He also loves anything that has to do with a farm right now.  He also loves being in the kitchen with me when I am cooking so, in order to work on our sounds and recognizing and allowing him to be in the kitchen while I am cooking I made a game for him that allows all of that.

I just went and bought some foam sheets and then I found some farm foam stickers on Amazon.com and put them together to make a memory game for him.  I cut the foam sheets into two inch squares and then stuck the stickers on them with a magnet on the front and back.  It's just hanging out on our fridge and when he turns them over, it works not only on learning but also his motor skills.  He loves it and so do I.  We have a lot of fun saying the names and making the sounds.

It took such little time and such little money both of which are bonuses. Not to mention, I think it turned out kinda cute!


Wednesday, May 27, 2015

Half Apron Tutorial


 With a hectic weekend with lots to do and much needed family time, I'm back with a cute, easy half apron tutorial. 

We were having a night where a group of girls from our church were serving other members of the church dinner and dessert.  We had the girls dress in their best dress in order to make it more like a fine dining restaurant instead of just a fast food drive through window.  To make it even a little more special for the girls, we made them each an apron to wear so if accidents did occur while serving the food, they wouldn't get it all over their nice clothes.

This is what we came up with.  Isn't it fun!  (Mind you, it would look lots better if I knew how to use my camera and the editing program I have.  But, I'm working on it! :) )The best part is that it is super easy and pretty cheap to make.


Materials Needed:   I used duck cloth for this one because it is a little heavier but any cotton should work fine.

2/3 yard fabric (This will probably give you two as you only need one piece of 22x22 inch piece)
1/2 yard coordinating fabric (This will also be enough for two)
Thread
Pins
Scissors/Rotary Cutter and Mat
Ruler

Steps:

1. First cut a square for the apron part that is 22x22 inches long.
2. Cut a strip of coordinating fabric that measures 5 inches wide and 23 inches long for the band
3. Cut two strips of coordinating fabric that measures 4 inches wide 30 inches long for the ties
(This is what you should have after you have completed cutting out all the parts of the apron.)

4. Take the apron part and fold 3 of the sides over 1/4" and iron then fold 1/4" again and sew the folds down, near the edge of the fold. (I surged mine to finish the edge.  If you have one do so, if not make sure you fold it over to make it look clean and finished.)


5. Take the band piece (5x22 inch piece) and fold down the short edges 1/2 " and iron down. Then fold down long edges 1/2" and iron down. After ironing the edges fold the band in half lengthwise and iron it again to create a crease in the middle. (Don't worry about folding this part over 1\4" and 1/4" again as it will be enclosed and looked finished when done.)

6. Take your apron piece and your band piece and pin the top part of the apron (the side that was not folded down 1/4' twice.) into the crease of the band. First pin the apron to the bottom of the band part like pictured below then bring down the top part of the band and using the same pins you used from the bottom pin, take the pins out one at a time pinning all three pieces together.  This allows for the apron part to really stay up in the crease without having to re-adjust while sewing. 

7. Sew band down close to the edge. 

 
 8. Take your two tie strips and fold down 1/4" and iron and then down 1/4" again and sew down. (You do not have to do this to one of the small sides as it will be going into the band of your apron)


9. Place the unfinished edge of your ties into the side of the apron where there is an opening between the band and the apron.  Place in about a half and inch and stitch the tie into the apron by sewing over the band and tie. 


10. Wear and enjoy!  This would make such a great gift also!

Thursday, May 21, 2015

H is for Hummus!


I have to admit, the first time I tried hummus was only about two years ago.  I was eating lunch at work and a friend of mine pulled out some chips and some sort of dip that quite honestly at the time looked disgusting!  She asked if I wanted to try it and in trying to be a bigger adult with food and the textural issues I have with it, I thought I need to give it a whirl.  Oh boy, am I glad I did!  It was delicious!

So, after that brave new adventure, I thought to myself "I must play around with ingredients and make this delicious concoction."  I am a fan, but unfortunately the hubs doesn't like it so much.  So, I can't make it often or I eat the whole thing. 

I love eating this hummus with tortilla chips the best but crackers or pita bread is also delicious! 

I promise this tastes as good as it looks!


 Hummus Recipe:

1 can garbanzo beans

l juiced lemon

1/4 cup onion

2 cloves garlic

2 teaspoons cummin

1/8 teaspoon red pepper flakes

1/4-1/3 cup Tahini

1 Tablespoon olive oil

Add all ingredients to a food processor except the garbanzo beans and blend together. (Make sure it is blended well.) Add the garbanzo beans last and blend again until beans are incorporated into the other ingredients.

Enjoy!


Monday, May 18, 2015

And the "SKOR" is...


Cake!!

That's right my friends, you will definitely score with friends or family if you make this delicious SKOR Cake.  This is one of our favorites at our house.  It's moist, light, super easy to make and delicious!

Because this cake is so fabulous, I wanted to share the goodness with you and not keep it all to myself!

Doesn't this look divine?


SKOR Cake Recipe:

One yellow cake mix
A small package of  dry instant chocolate pudding (DO NOT MAKE PUDDING)
2 cups water
2 eggs

Beat all ingredients for two minutes.  Place in a greased 9x13 pan and bake at 350 for 35-38 minutes.


 Frosting:

1 cube margarine (softened)
2 egg yolks
1 cup powdered sugar
Cool Whip (8 oz)

Mix together the softened margarine, egg yolks and powdered sugar and then fold in the cool whip.   Put on top of  the cooled cake.

Then add:

3 Crushed Skor bars

Enjoy!  Make sure if this isn't all eaten in one sitting that you store it in the fridge!

Friday, May 15, 2015

Wassail in May?!


I'm not sure where all of you were today, but I was at home bundled up in blankets, slippers, and a sweatshirt because my house was so cold.  The weather outside wasn't so warm either today with the wind and rain.  It's the middle of May people!  Why is it so darn cold here?

While trying to figure out the answer to that question, I took myself back to when I was growing up and my mom would have wassail and cinnamon rolls waiting for my siblings and I after school on a cold rainy day.  Well, I took myself partly back, with two grumpy little boys who did not take naps and woke up early this morning all I had time for was to make the wassail.  It was heavenly!

While taking my first sip, I pretended for a quick minute that I was sitting by a fireplace, reading a great book, sipping my wassail with the kids playing nicely with each other in the background.  Mind you that is all it was is a pretend quick minute, because the next thing I heard and saw was my two year old slipping on the kitchen floor with wet toilet paper all over him. my bathroom, and my kitchen.  I'm pretty sure I know where that water came from and it wasn't a sink or tub. Gross!  ( I love my little man but he sure is curious!)

So, I wanted to share with you the recipe for my favorite childhood cold day drink and then when you take your first sip, you can pretend that you are sitting by a fire too!  Sometimes all you need is a pretend quick minute!


Wassail

Blend and boil for 5 minutes:

2 cups sugar
1 cup water

Add:
2 cups frozen orange juice concentrate (water added)
3/4 cup lemon juice
2 teaspoons vanilla
2 teaspoons almond flavoring
2 quarts water

Simmer until hot


Enjoy the tasty goodness!

Sometimes I like to add this Aspen spice to it and it makes even more amazing!  However, its getting more and more difficult to find.  The only place I have been able to find it is Orson Gygi or every once in a while Tai Pan.


Wednesday, May 13, 2015

There's a cowboy coming soon!

Hello All!

Before I write about the cowboy, let me introduce myself.  I'm just starting on this blogging journey and so excited to do so.  I love sewing, crafting, and cooking/baking, and creating learning activities for my toddler as I am a graduate in Elementary Education.  When I am not taking care of my two insanely cute boys and my kid at heart husband, those are the things you will probably find me doing.

Now, on to this cowboy coming soon.  My sweet sister-in-law is pregnant with her first little boy due now at anytime.  His daddy is a cowboy at heart and wants his little one to be also.  I couldn't be more excited to be an aunt again.  So, in honor of this little cowboy joining the family I threw her a much needed and much fitting cowboy/western themed shower.

This was tons of fun to plan and set up for, but the unfortunate part was only about four people were able to attend because of other obligations or the weather.  However, those that showed up were awesome and we had a blast.

While trying to figure out the set up and food for the shower, this is what we came up with. (Oh, man, my camera didn't do such a hot job)  This was super fun to set up! You can't quite see all of it and I'm afraid that a cute little two year old got his hands on the camera and deleted some of my pictures.  But, for the tablecloth I used denim material with a red table runner and the cute cow print banner (it was supposed to have the cowboys name on it, but I was running late and somethings you just have to let go of.) I had the food served in things such as fruit and veggies were served in pie tins with their dips being served in plastic cowboy hats on the side, the chips and rolls were served in cowboy hats, and the silverware were in mason jars.  My favorite part however, which is not pictured were the doughnuts my awesome mom made for the dessert.  We also had delicious kabobs with steak and chicken that were smoked! (Delicious!)


 I also created a candy bar of sorts for the guests to be able to take something home to thank them for coming.  This was really fun to put together and my mom and I put our heads together to find some candies that were just a little bit "older."  We found chic-o-sticks, black and red licorice, kits taffy (my favorite), trail mix, bridge mix, Neccos, and jawbreakers.  We had the guests pick what they wanted and put them in a small brown paper sack.  The guests that did show up loved it!
P.S.  Aren't those jars cute!  Totally ones that were found in a mercantile store way back when right?  (At least that is what they show on Little House on the Prairie)  They were a great dollar store find!


The shower is done and now Mr. Little Cowboy can come at anytime!  I hope you enjoyed my ideas!  Let me know what you think!